So you've just joined Blackout...First things first, click on
'Me',
'Account',
'Store' and then scroll down and click on the green tab which says
'2 weeks trial FREE'.
Premium membership gives you a few extra benefits, such as giving your players nicknames and seeing when one of their skills increases.
As it’s free for 2 weeks, you might as well give it a try. The full list of benefits can be found
here.
Now, where are my players?...Click on
My club at the top of the screen and then click on
squad. This is where in all honesty; you'll be blessed with a bunch of no-hopers.
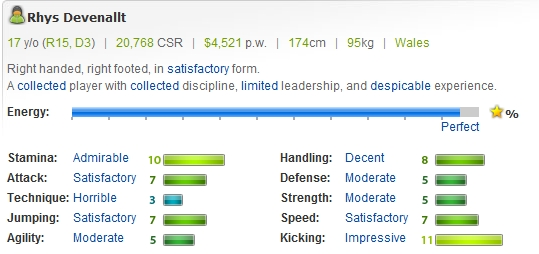
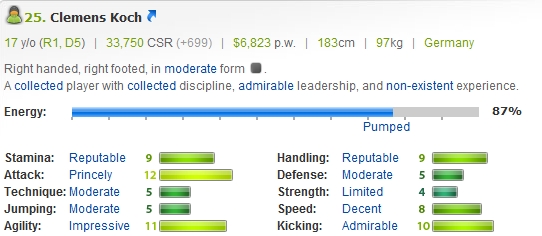
The best player in my 'test team' was this guy
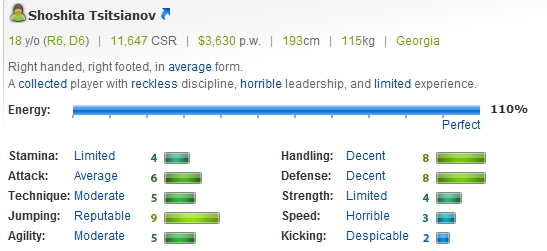
I would place his value at $1. Yes, that’s one single Blackout Rugby dollar!!!
He, along with the rest of the squad will be fired during the next month as I look to improve my squad.
Why is that guy valued so little? and what should I be looking for in my players?...Put simply his stats are very low & in the wrong key areas. His CSR (Complete Skill Rating) at 11,647 will not interest other managers on the transfer market and you can buy much better players for next to nothing.
PropsYour props are vital in the scrum. Therefore they need to have good strength and technique.
Your props should weigh more than 110kg and be shorter than 195cm.
Heavier = betterTaller props will help your lineout work more effectively, but shorter props are able to scrummage better. It’s about finding the right balance.
HookerYour hooker is vital for winning lineout ball. His handling is a good indication on his throwing ability, so bare than in mind when selecting a hooker.
Ideally he will also have good technique for hooking the ball in the scrum & good strength for defending scrums.
His height is important. If he is taller than your props it creates an imbalance in the front row.
LocksYour locks will be the tallest players in your forwards. Anything above 200cm is usually a good height for a lock.
They need to have good jumping and handling, for contesting and securing lineout ball, along with good strength for pushing scrums.
Flankers & Back rowFlankers and number 8's provide support in the scrum, so need to have good weight and strength. Flankers provide a good opportunity to turn over the ball at the breakdown, so technique is very important for them, along with good defence.
Scrum halfYour 9 will need to be a good all rounder. As he handles the ball more than any other player his key skills are handling, speed to keep up with play and attack for a quick pick and go.
Fly HalfAs your designated kicker, your fly half will obviously need high kicking.
Handling, attack, defence, speed and agility are all vital skills.
WingersWingers will usually be your fastest players, so speed is vital here. Good attack allows them to break through tackles and agility also plays a part in this.
In defence, it is your wingers who will often track back to make that all important tackle, so a high defence level is also useful.
CentresCentres are usually big, strong and powerful runners. They need good attack, speed and strength when your side are attacking, but also good defence as an opposition line break in the centre of the pitch will often result in a conceded try.
Full backAs the last line of defence, your full back will need high speed, defence and kicking ability.
They need to be a bit of an all rounder, as they find themselves working in both attack and defence.
How do I improve my team then?...A vital tool for improving your squad is the transfer market.
Click on
'Global’ and then click
‘Transfer Market’As a new team there is the temptation to go out and spend a huge amount on players, but in reality your bank balance will quickly vanish and you could find yourself in financial difficulty.
The key is to get a squad capable of winning your league, without having to spend over the odds.
Its worth remembering that as players age, they gain experience through playing matches.
A
30 year old player with
Reputable experience will far outperform a
17 year old with similar skills, but with
non-existent experience.
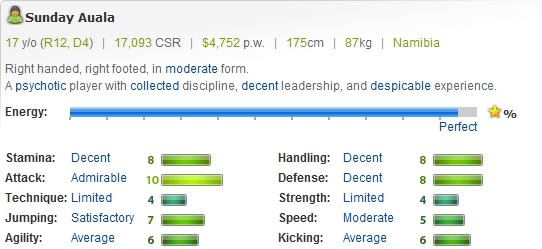
How'd you do it then?...Within 10 minutes of looking on the transfer market I had purchased my first player

For a grand total of $2k I have managed to secure my first signing- who is also by far my best player.
By picking up similar bargains you should be able to get 15 players for less than $100k. Note that there is a higher price to pay for props and locks.
Your captain plays a very important role in your side. The key skills which determine their ability as a captain are their
leadership and their
experienceBut I want to develop my own players?...The ability to promote and train one of your players is one of the best aspects of the game. To start off, you'll need to hire some staff and upgrade your facilities.
Click on
'My Club',
'Facilities',
'Youth Academy' and then click
'Construct New Level'This will open up your level 1 youth training facility. However, it is useless without having staff to run it.
Click on
'My Club',
'Staff',
'Academy' and then hire a
Level 1 Youth Coach and a
Level 1 Youth Scout.
What now?...Now you need to set your training.
Click on
'My Club',
'Training',
'Youth Training' and then click on the two drop down boxes and select which skills you would like to train.
What do the staff do?...Youth Coach - Is the man who trains your Youth Academy players each Thursday.
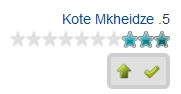
Youth Scout - Gives you 5 scouting stars per week, which you can use towards scouting a player.
Stars can be built up over a period of weeks and then used at once to promote a player. Generally, players who were scouted with between 15-30 stars will be good enough to make your first XV squad in your first 2 seasons.
Youth Manager - He reveals a small number of your youth team players skills each week. At this stage is not worthwhile having a Youth Manager as his wages will far outweigh the benefit to you while your YA is in its infancy.
Note: When you first join Blackout, your Youth Academy will be similar to your Main Squad in that there will be very few decent players in there. It will take a season or two before your Youth Squad starts to see the benefits of your scouting.How do I spot potential?...Spotting the next big thing can be very tough! You’re likely to stumble across many ‘Stephen Jones’ before you come across a 'Dan Carter'.
To get an idea of who is worth promoting, Click on
'My Club',
'Junior League' and then onto your most
recent fixture and click
'Reporters Summary'.
Scroll down your list of players and you'll notice that they have a star rating beneath their name. These stars indicate how well they played during that match
Anything over 2 and a 1/2 stars usually indicates a player performed to a decent standard. However, the players
form needs to be taken into account.
As an example, a player with
Impressive form who achieves a
3 star rating, will usually not be as good as a player with
Horrible form who achieves a
2 star rating.
It's about finding a balance between the form and star ratings.
What next?...To promote your player, click
'My Club',
'Office',
'Academy' 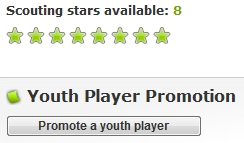
On this screen you will see how many
Scouting Stars you have available.
Then click the
Promote a youth player option.
Click on the player you wish to promote & then select the amount of stars you wish to use to scout his replacement.
Training?...In order for your players to improve, they need training.
Training initially is very cheap to do, but as your facilities and coaches get upgraded, your costs fly up.
For this reason I would suggest not upgrading beyond level two for your first season and to look to upgrade to level three in your second season.
Levels 4 and 5 take a major hit on your finances, so should only be bought by clubs who make around a 100k profit over every two week period.
By spreading your upgrades out over a number of seasons, it allows you to build up a decent bank balance. With my test team I was able to build up a bank balance of
over 600k in just 4 weeks, partly by not upgrading my facilities straight away and also because I bought only the very necessary players to improve my squad.
What to hire?...Your trainers' performance is dictated by the level of your facilities.
A level 2 trainer who works in a level 1 facility, will only be able to train players at level 1 standard.
For this reason you should
never upgrade your trainers level above that of your facility level.
To start off, click
'My Club',
'Facilities',
'Senior' and
'Construct New Level'You will now have a level 1 facility with 20 training slots available to use.
Training routines can vary from training a small number of players on a high level of training- to training each member of your starting lineup on 2 sessions -
Both offer their own advantagesFrom a quick financial gain point of view, I would suggest a training routine which will allow you to develop two prospects to a level where they will be worth a lot of money.
The next step is to hire your coaches. At this early stage of the game it is best to just hire
attack and
defence coaches, but if one of your trainees has a high kicking level then buy a kicking trainer too.
***Kickers are very valuable on the Transfer Market, so a well rounded player with a high kicking stat will can be very rewarding***To do this, click 'My Club', 'Staff' and then hire both
Attack and
Defence trainer. How many of each trainer you sign is totally up to you, but you should base the decision upon the training needs of the two prospects you will be training.
My trainees...I have broken down their training to show my reasons for each choice. My aim with these two will be to sell them for a huge profit, so their training has been based around that fact.
I am training this guy up to be a
centreHandling x1 session - Handling is a great stat to have for backs, but no one looks at a player and thinks 'WOW he has great handling'. By improving it with one session he will slowly get it to around the 10 level, which is when I will remove it and put it elsewhere.
Attack x2 sessions - His attack is great for his age. A high stat will gain higher CSR amounts through training than a lower stat does, so by putting 2 attack sessions on him he will gain a good amount of CSR, whilst improving his already good attack.
Defence x2 sessions - His defence is a key skill for a back. A bad tackler can lead to the opposition creating line breaks, so prospective buyers will want to see a decent level of defence.
Speed x3 - It is never advisable to train a stat using 3 skills, as for each extra session you put on a stat the returns become slightly diminished. However, speed is a very valuable skill to have and buyers will spend a lot of money to acquire a speedster.
Agility x2 - As with speed, his agility is someway behind his other stats. The 2 sessions should help this catch up.
That’s 10 sessions, which will require 8 attack trainer sessions and 2 defence trainer sessions.
My 2nd trainee:
Because of this guys good kicking level, I will train him up as a
Fly HalfHandling x1 - As above re. the handling. He is close to having a 10, which looks much better than 8. As soon as he reaches 10 the extra session will be moved elsewhere.
Defence x2 - Defence is a key skill for all positions. His low starting level should mean he pops quicker than his other skills will.
Speed x2 - A vital skill in both attack and defence and as mentioned above -
HIGHLY PROFITABLEKicking x 3 - His kicking will be trained in the short term up to level 12. When it hits this level the trainer will be sacked. As he is the only player benefiting from the kicking trainer I want to try and maximise his skill level quickly and avoid wasting any extra expense on the trainers wages.
Attack x 1 and
Agility x1 - Whilst these skills are two of his lower back skills, I want to try and get his best skills up quickly so have put minimal focus on his attack and agility. As soon as his kicking and handling reach the mentioned levels, the extra sessions will be put on attack and agility.
TacticsPossibly the most difficult aspect of Blackout Rugby. Just how do you select your tactics???
I'll try to keep it basic...
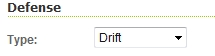
A
Drift defence works best against teams who use a high % of
expansive play.
The tell tale sign of a drift defence is when a team makes a lot of tackles which send a player into touch.
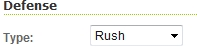
A
Rush defence works best against teams who use a high % of
driving plays. It is also thought to be the best defence type against teams who play a lot of pick and go, although all defence types work well against
pick & go.
A tell tale sign that a team is using a rush defence is that they concede a large number of line breaks, but very few are converted into tries.
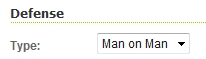
A
Man On Man defence works best on teams who play a high % of
creative plays.
IntensityIntensity plays a big part in deciding the result of a match.
With next week in mind (WNWIM) - For games where your side are much better than the opposition and you want to conserve energy. For your first few seasons it will be a rarity for you to play wnwim, unless you want to 'throw' a match to save energy.
Normal - For games where you think you have an advantage over your opponent on 'an even playing field'. A normal will see off a BOT team as long as you pick a reasonable squad.
Like there’s no tomorrow (LTNT) - For games where you need to go all out for the win. Used for when your opponent is better than you, but you fancy sneaking a win. Or you could be up against a team who fancies sneaking an upset against you.
Note: LTNT takes a lot of energy from your players. Rough guide to energy lossLeague TNT: 32% - Cup TNT: 16%
League Normal: 16% - Cup Normal 8%
League WNWIM: 8% - Cup WNWIM 4%
DisciplineBy the book - your team will sacrifice its rucking ability at the break down area, in return for a reduced penalty count. Highly recommended if your team has a lot of rebellious players.
Normal – Your team will try and play a balanced game.
Aggressively - Your team will go hell for leather at the breakdown in search for turnovers. Should only be used by teams who have well-disciplined players.
For a list of detailed tactics, check out this site
http://www.brcentrum.99k.org/tactics2.html
Full credit must be given to Wilf3uk from Wales who designed the initial guide. 


 I tend to look for good players who are selling at very late at night(uk time). I am less likely to get into a bidding war this way and often have the chance to snap up a player in the final minute of the auction. At 3am(uk time) there are usually around 200 managers online, so I have half as many managers to worry about.
